
Oiling Out and the Cause of Dead Spots in Oil Paintings
It’s been a problem for a very long time. At least according to the historical record. Blotchiness. Sinking in. Dead spots. For oil painters these are well known terms, conjuring up images of skin disease as much as painted surfaces, but whatever words are used the implication is clear – it’s an undesirable nuisance; a loathsome interloper in the creative process.  As for what to do about it, the traditional and handed down remedies have run the gamut from oiling out with different recipes to the frequent application of retouch varnishes of various types. What is the current thinking about all this? What might be the cause and best solution? What follows is not an exhaustive treatment on this topic by any means, but it shares results from some current testing and offers what we feel are best practices given what is currently known.
The Problem in Short
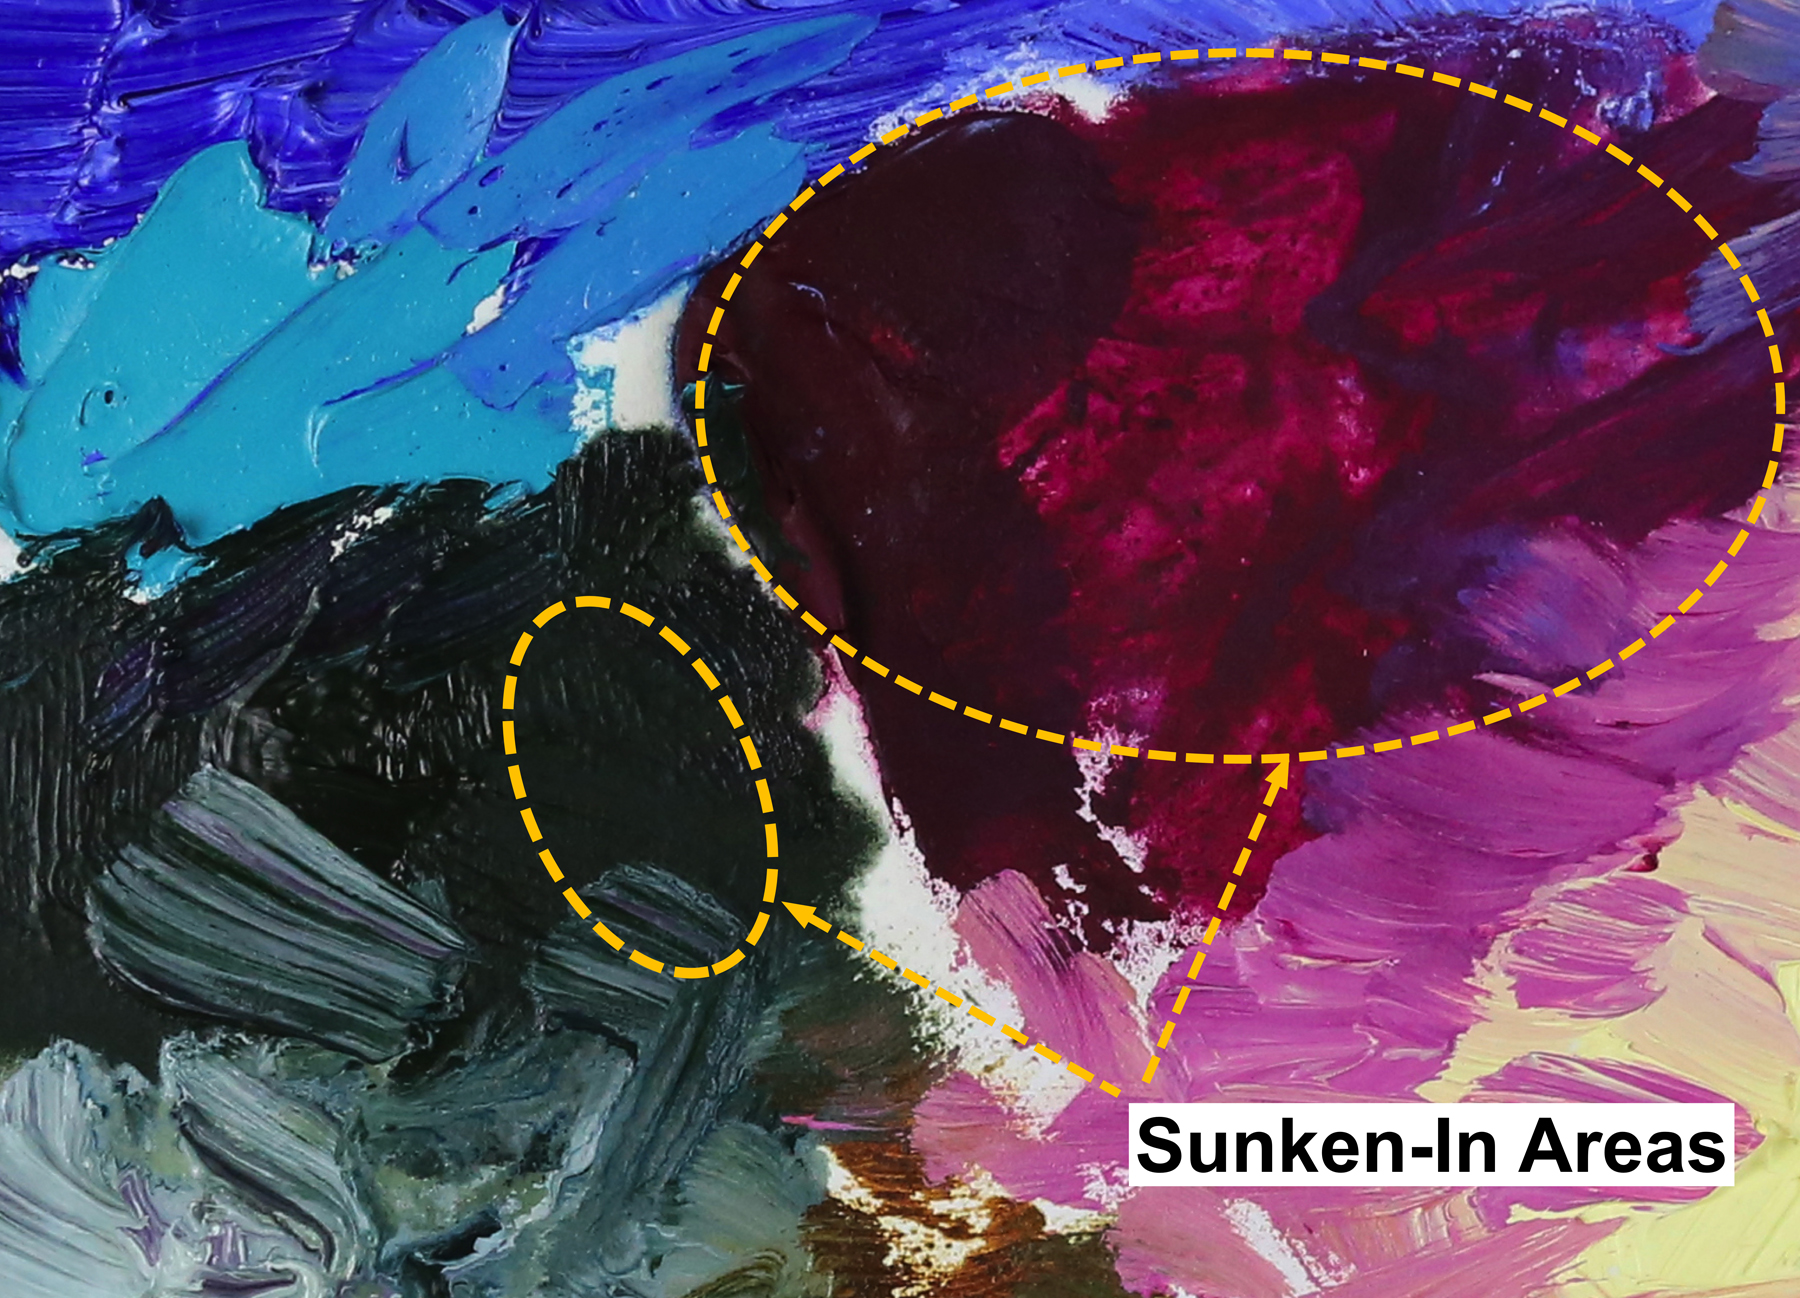
Before heading toward causes and cures it’s good to briefly define the problem, especially if this issue is new to you. What is being described here is the appearance of a dull matte area in a section of an oil painting. Thus the sense that the color has “sunken-in”, or gone “dead”. This is particularly annoying with darker colors, where their matte appearance makes them seem lighter and creates the problem of matching a color with fresh, glossier paint much more difficult (Image 1).
Causes
Absorbent Grounds and Solvent Use
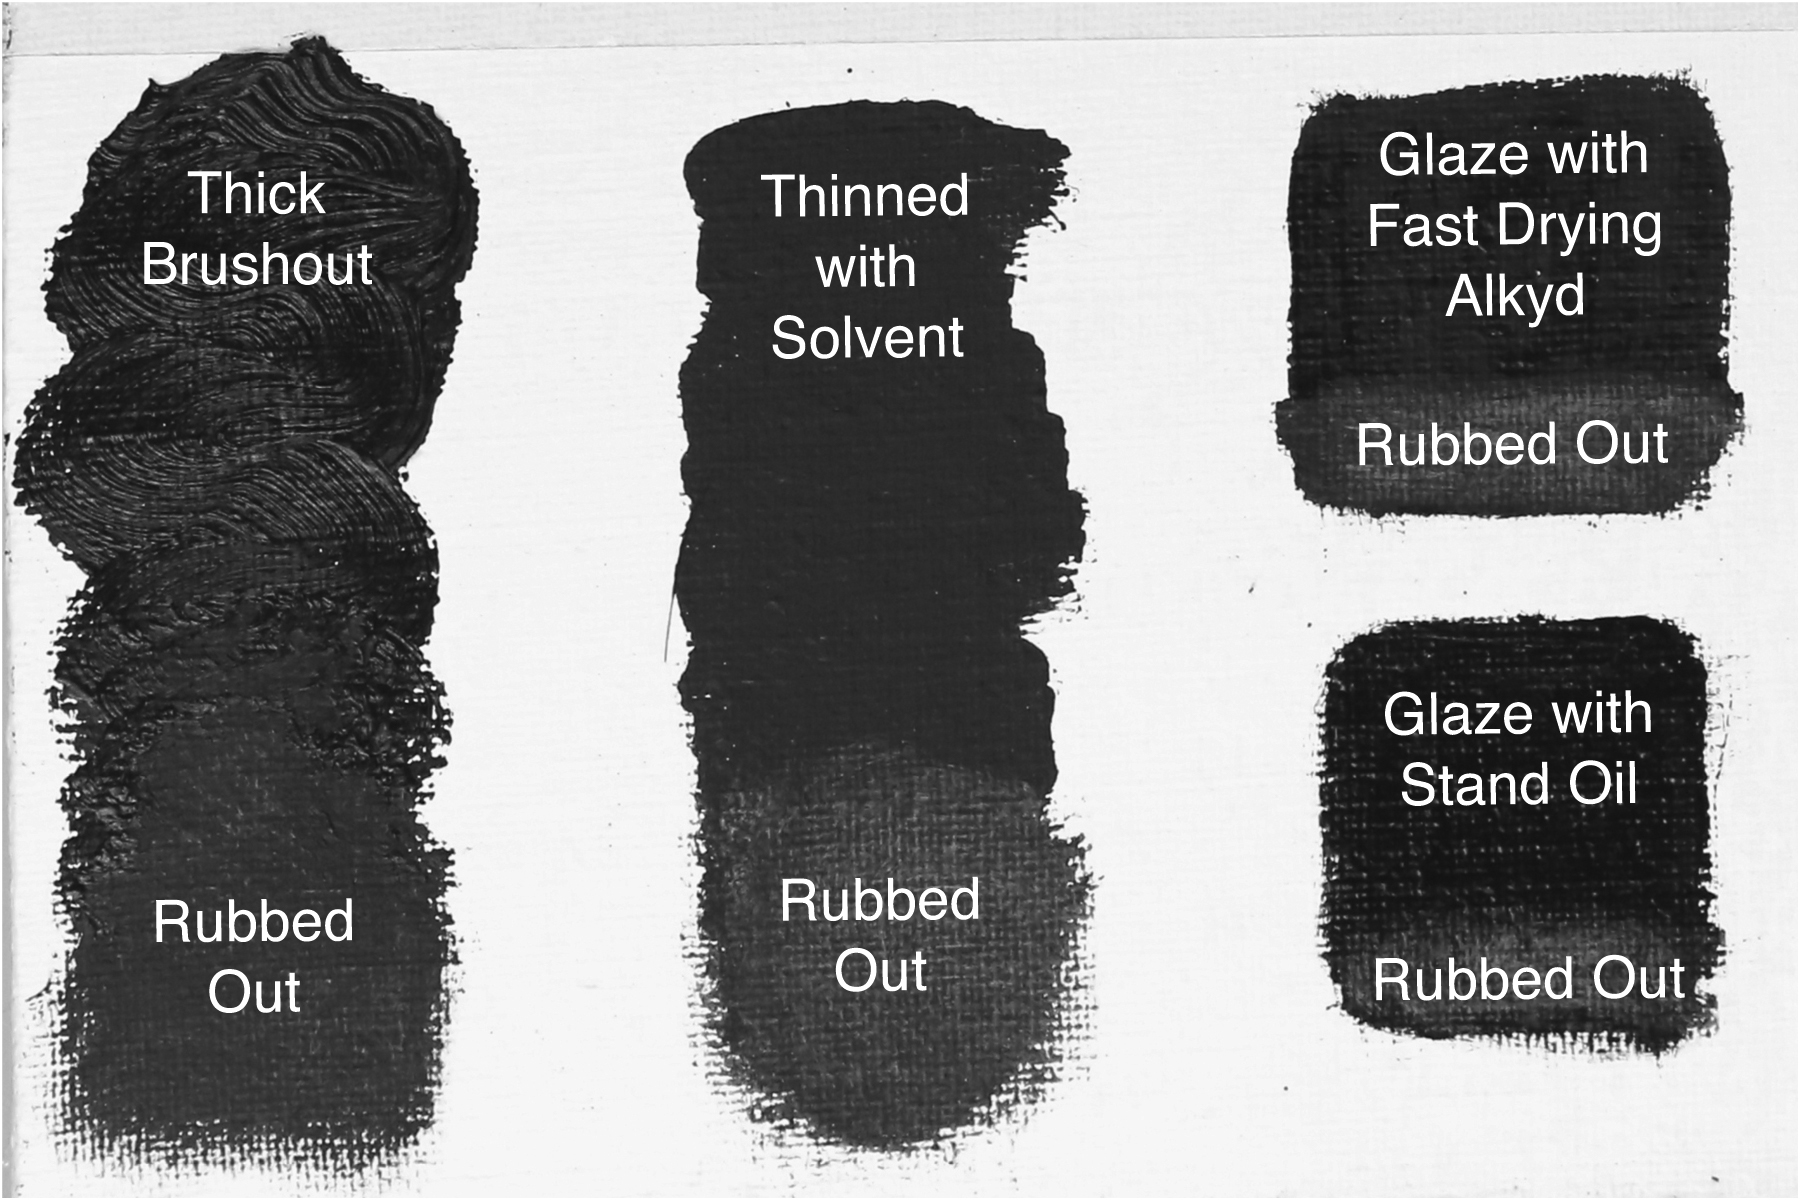
The most common chorus as to the causes of sunken-in patches of paint tends to focus on two areas – overly absorbent grounds and paints thinned with too much solvent. And of course these are two faces of the same coin, as both imply that the paint has become underbound to some extent: in one instance, by the oil being pulled down into a thirsty, matte surface, while in the other being spread out too thinly and readily soaking into the underlying layer. We wanted to put both of these causes to the test, so painted various swatches over an assortment of grounds, including GOLDEN Gesso, Acrylic Ground for Pastels, Absorbent Ground, and Williamsburg Titanium Oil Ground and Lead Oil Ground. For paints we chose Raw Umber, a color commonly associated with sinking-in, and Phthalo Green, which dries to a reliably glossy film like most synthetic organics. These were applied in various ways: thickly brushed out, blended with odorless mineral spirits to the consistency of cream, rubbed out with a cloth or cotton swab, and finally, mixed with a fast drying alkyd or Stand Oil as a glaze (Image 2).
Very Thin Applications
A third cause needs to be mentioned, which functions independently of a grounds’ particular absorbency; namely film thickness. For many paints, it turns out this alone is enough to cause a matte appearance to develop, as you can see in the following examples.
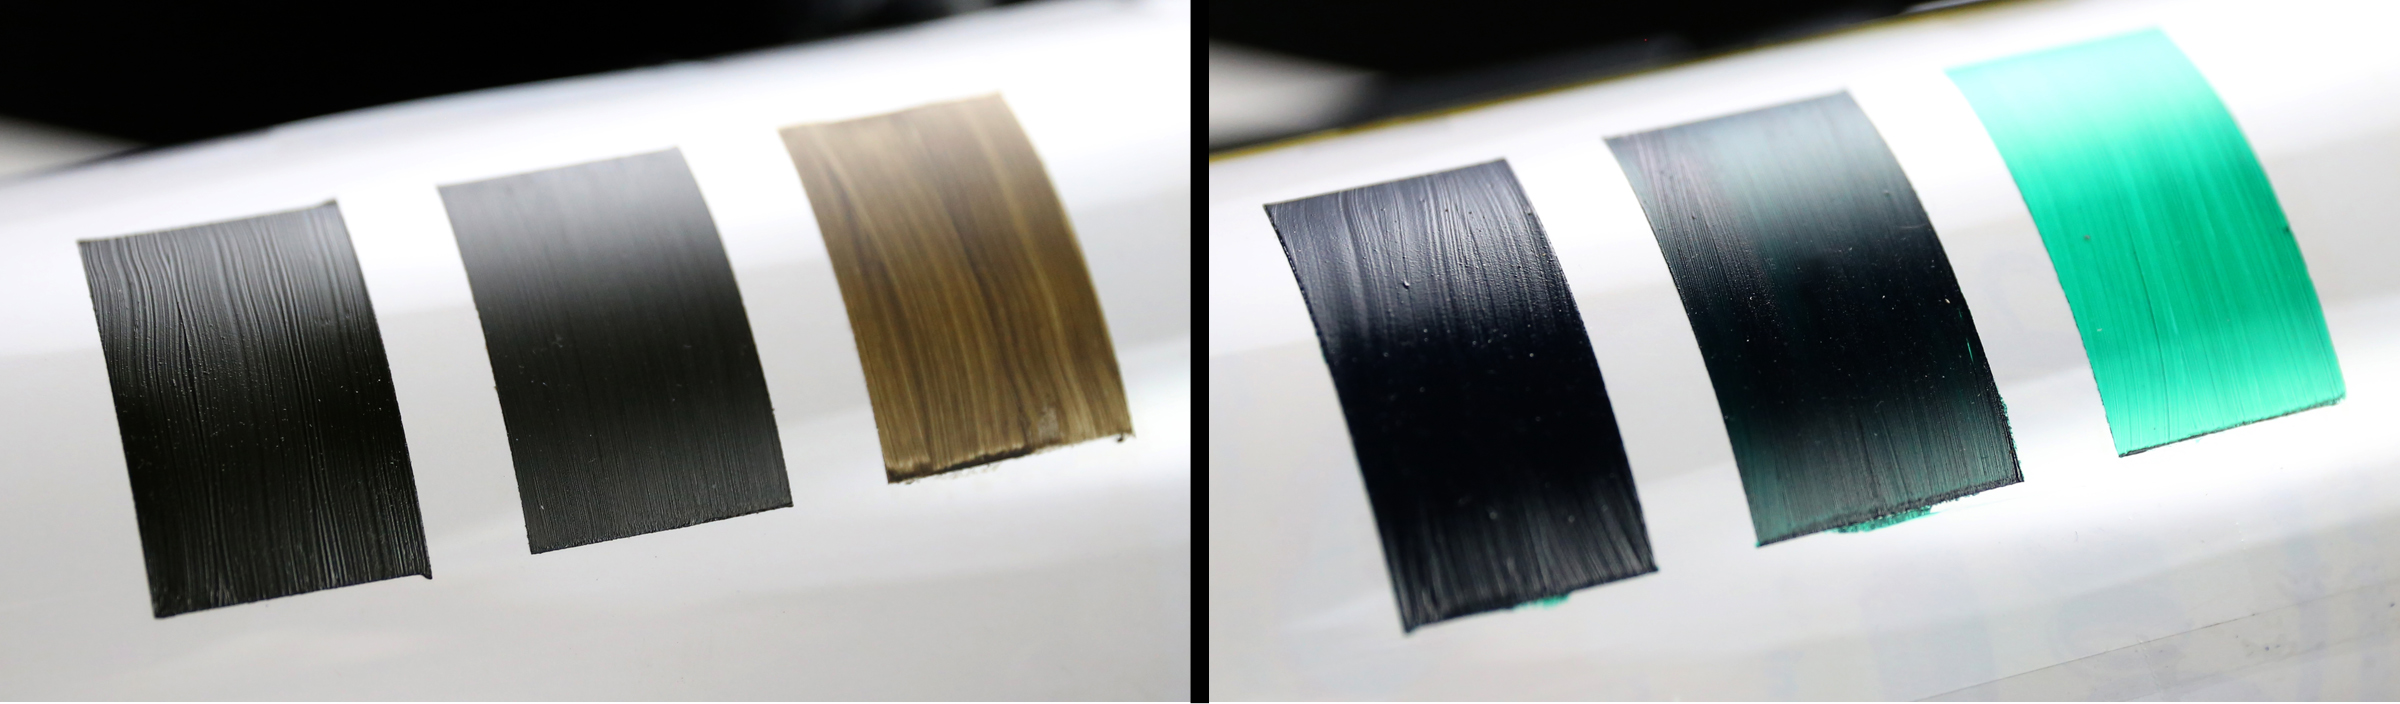
In the first one (Image 3) we applied Raw Umber and Phthalo Green in three different thicknesses onto a non-absorbent polyester film. Sheen is notoriously difficult to capture in a photo, but if you follow the reflections across the curved surface you can see changing degrees of gloss. For Phthalo Green, the gloss actually increases the thinner the paint is applied. Raw Umber, on the other hand, grows increasingly matte and in a very thin film, has a nearly dead flat appearance. Since none of this can be caused by absorbency, and Phthalo Green has even less oil by volume than Raw Umber, the only possible explanation is that the particle sizes of the different pigments have a large impact on the final sheen of the paint, especially when applied very thinly.
The second set of examples (Image 4) are simply two thicker piles of paint that were then scraped with a palette knife to create a thin film on a lacquered, non-absorbent drawdown card. In both cases the glossiness evident in the body of paint is lost in the thin scrape-out, where the thinner the paint the more matte the appearance. In fact, at its thinnest, the paint takes on an almost powdery appearance.
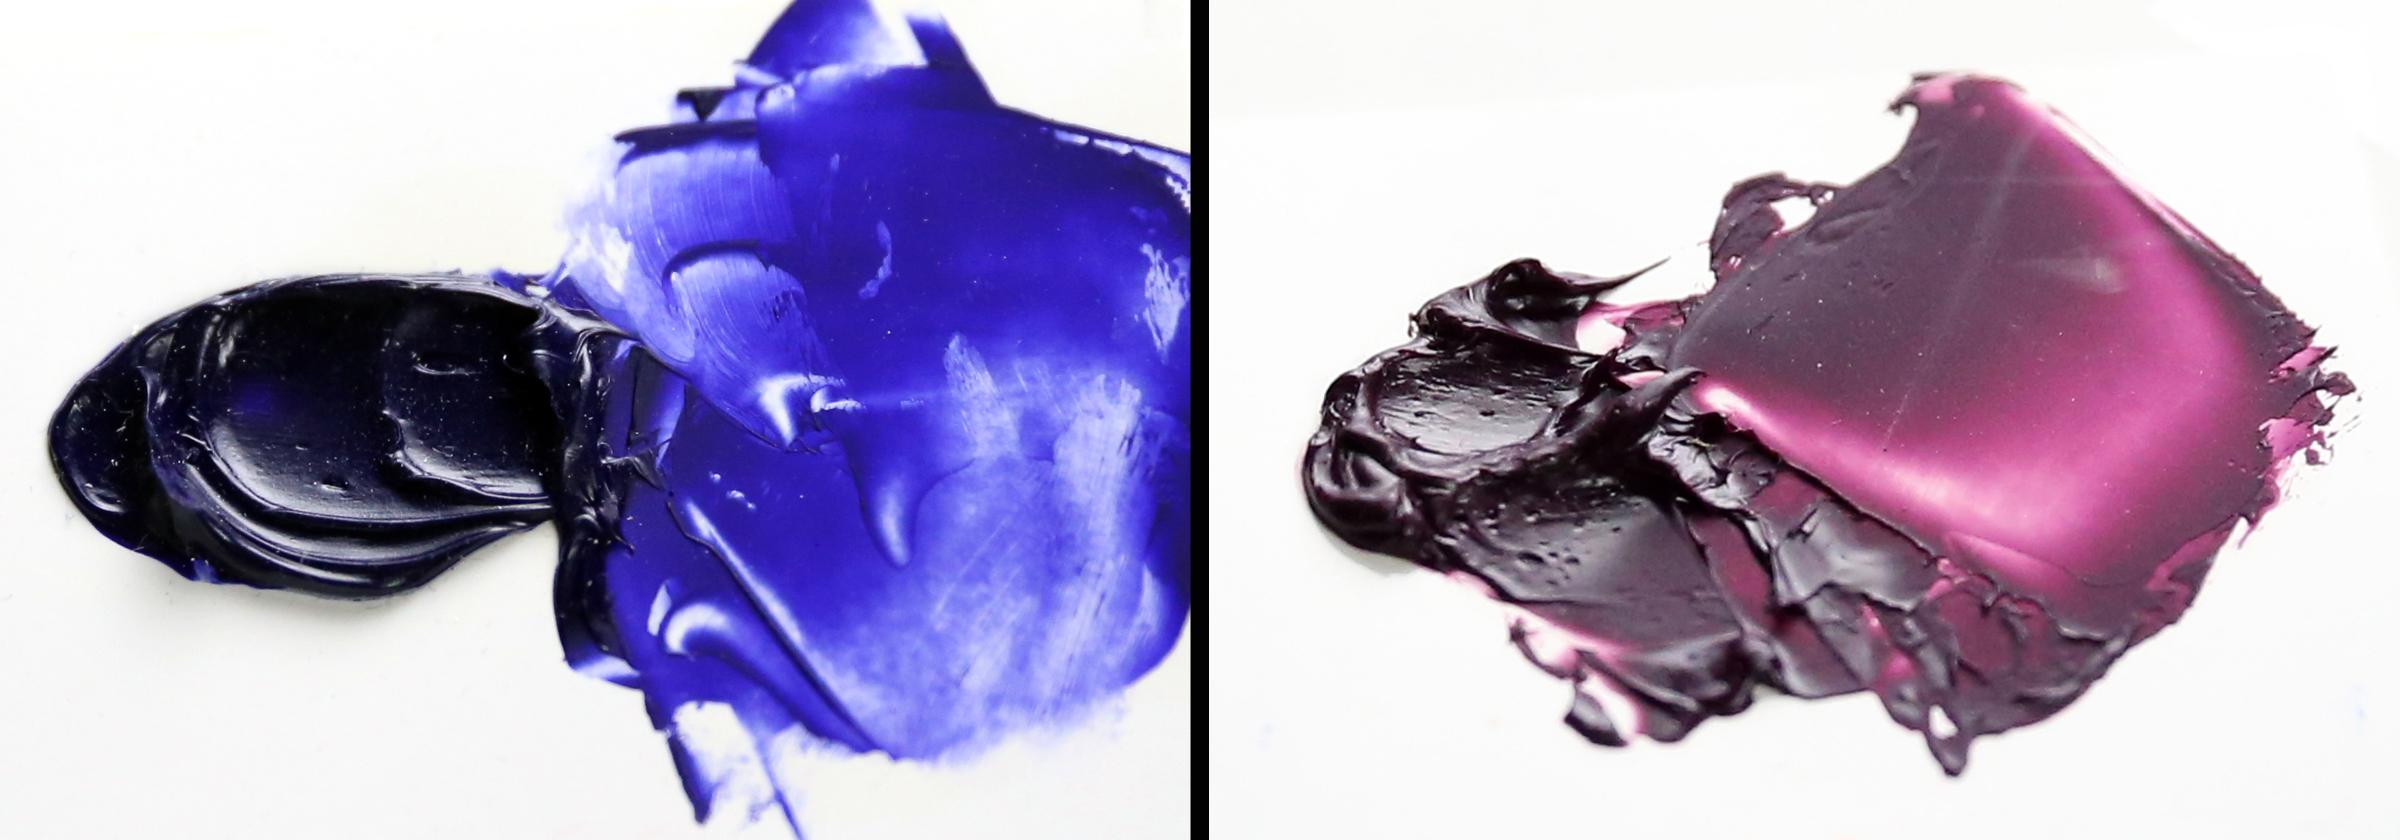
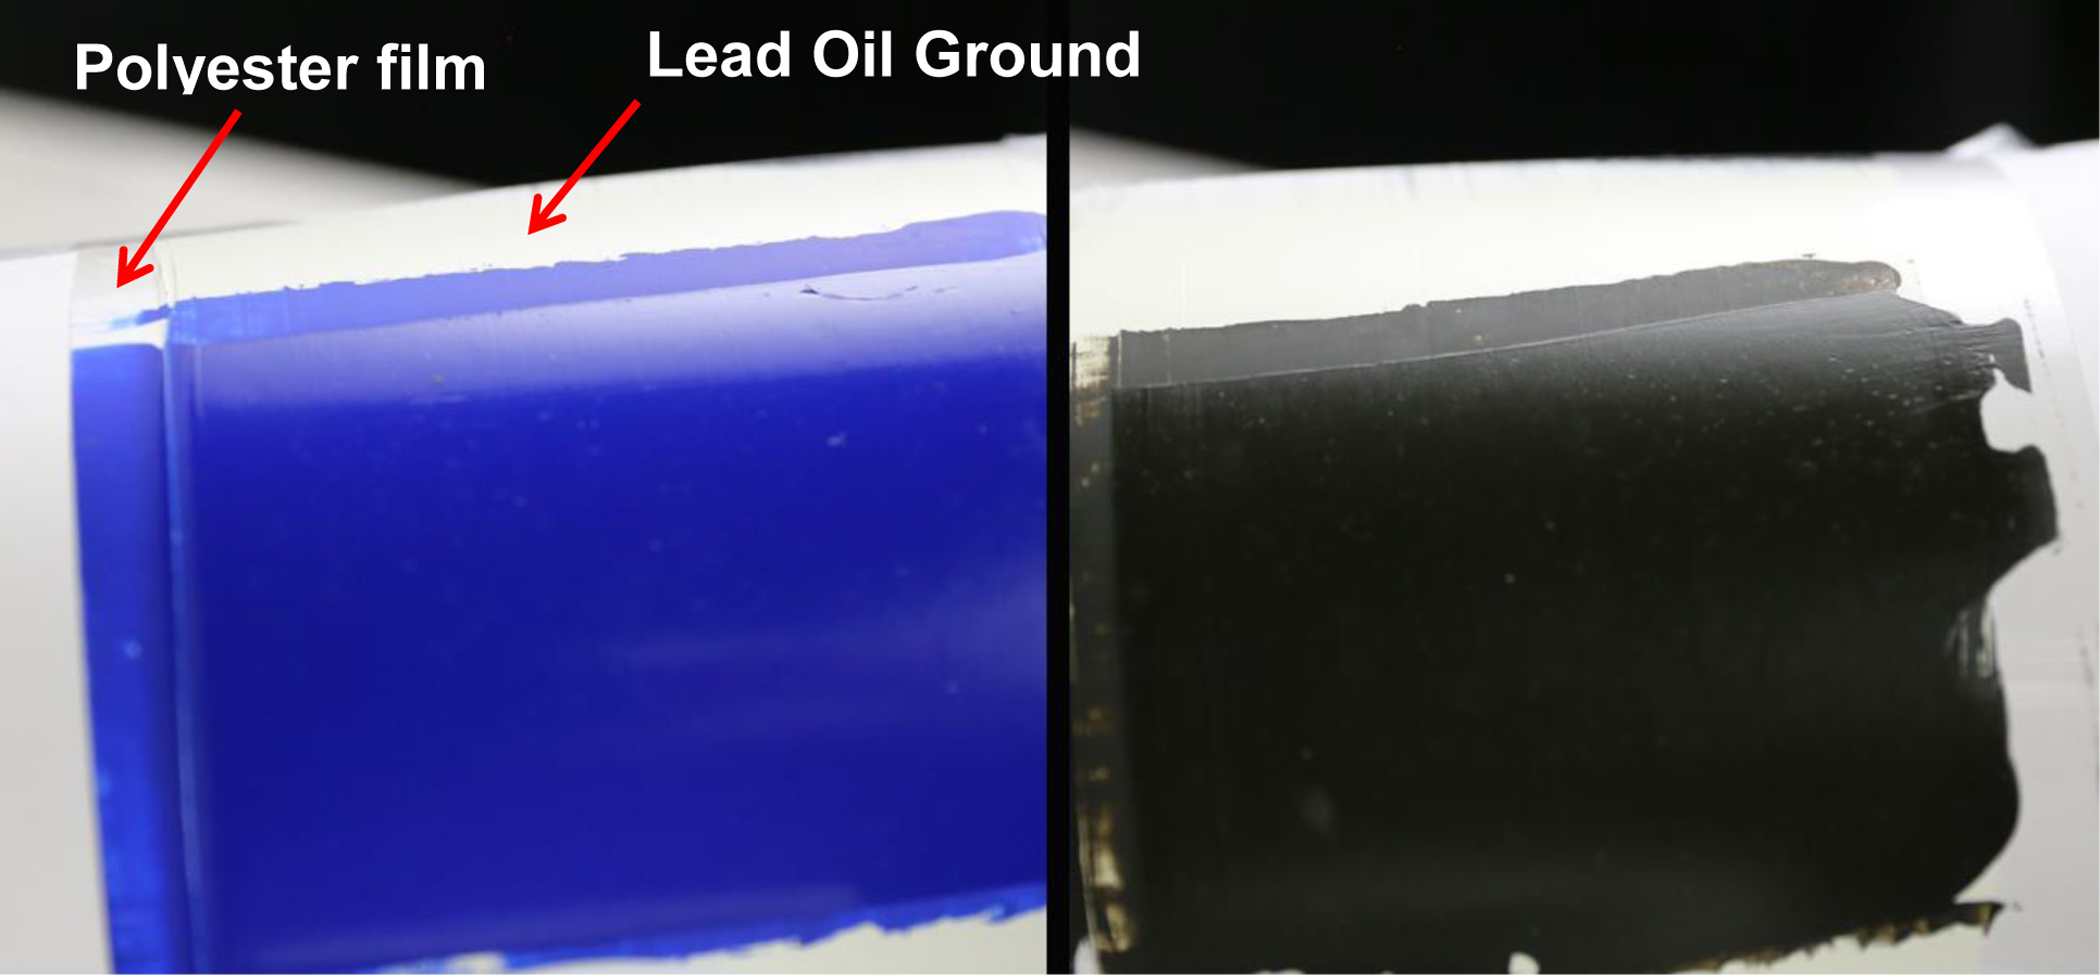
In the last example (Image 5) we show Cobalt Blue Deep and Raw Umber cast over Williamsburg Lead Oil Ground on polyester film. These are both cast at 6 mil thick, about the same as two sheets of paper, and clearly show the degrees of gloss you would expect for a well bound film. The thin, very matte strips to the top and sides are areas where the paint was scraped very thinly by the drawdown bar during application. The bands to the left are on the polyester film, while the ones on top are on the Oil Ground. This is important as it shows that the dead matte appearance is independent of any difference in absorbency between the Oil Ground and polyester film. Again, the only explanation is that the paints, when applied very thinly, can have the same appearance as a “sunken-in” area usually attributed to solvents or an overly absorbent surface.
Test Panel Results
Paints
While only including two in this testing, they performed as expected, with Phthalo Green creating a glossier film in all instances, even when thinned with solvent to a very fluid consistency and applied on an extremely absorbent ground. As Phthalo Green has less oil by volume than Raw Umber, this is clearly a function of pigment particle size more than anything else.
Grounds
It’s important to note that the connection between absorbent grounds and sinking-in stretches well back into the historical record, with documents recording artists bemoaning, complaining and finding fixes for grounds they felt were too absorbent. At the same time, a seemingly equal number pursued them with fervor, especially during Impressionism and other periods when a matte surface was actually prized and thought to give a more direct, brighter, and less yellowing appearance. So this is not a new issue that can be easily hung at the door of modern formulations or materials, but rather a common one known to occur with even the most traditional materials of the highest quality.
GOLDEN Acrylic Gesso (both 2 and 4 coats)
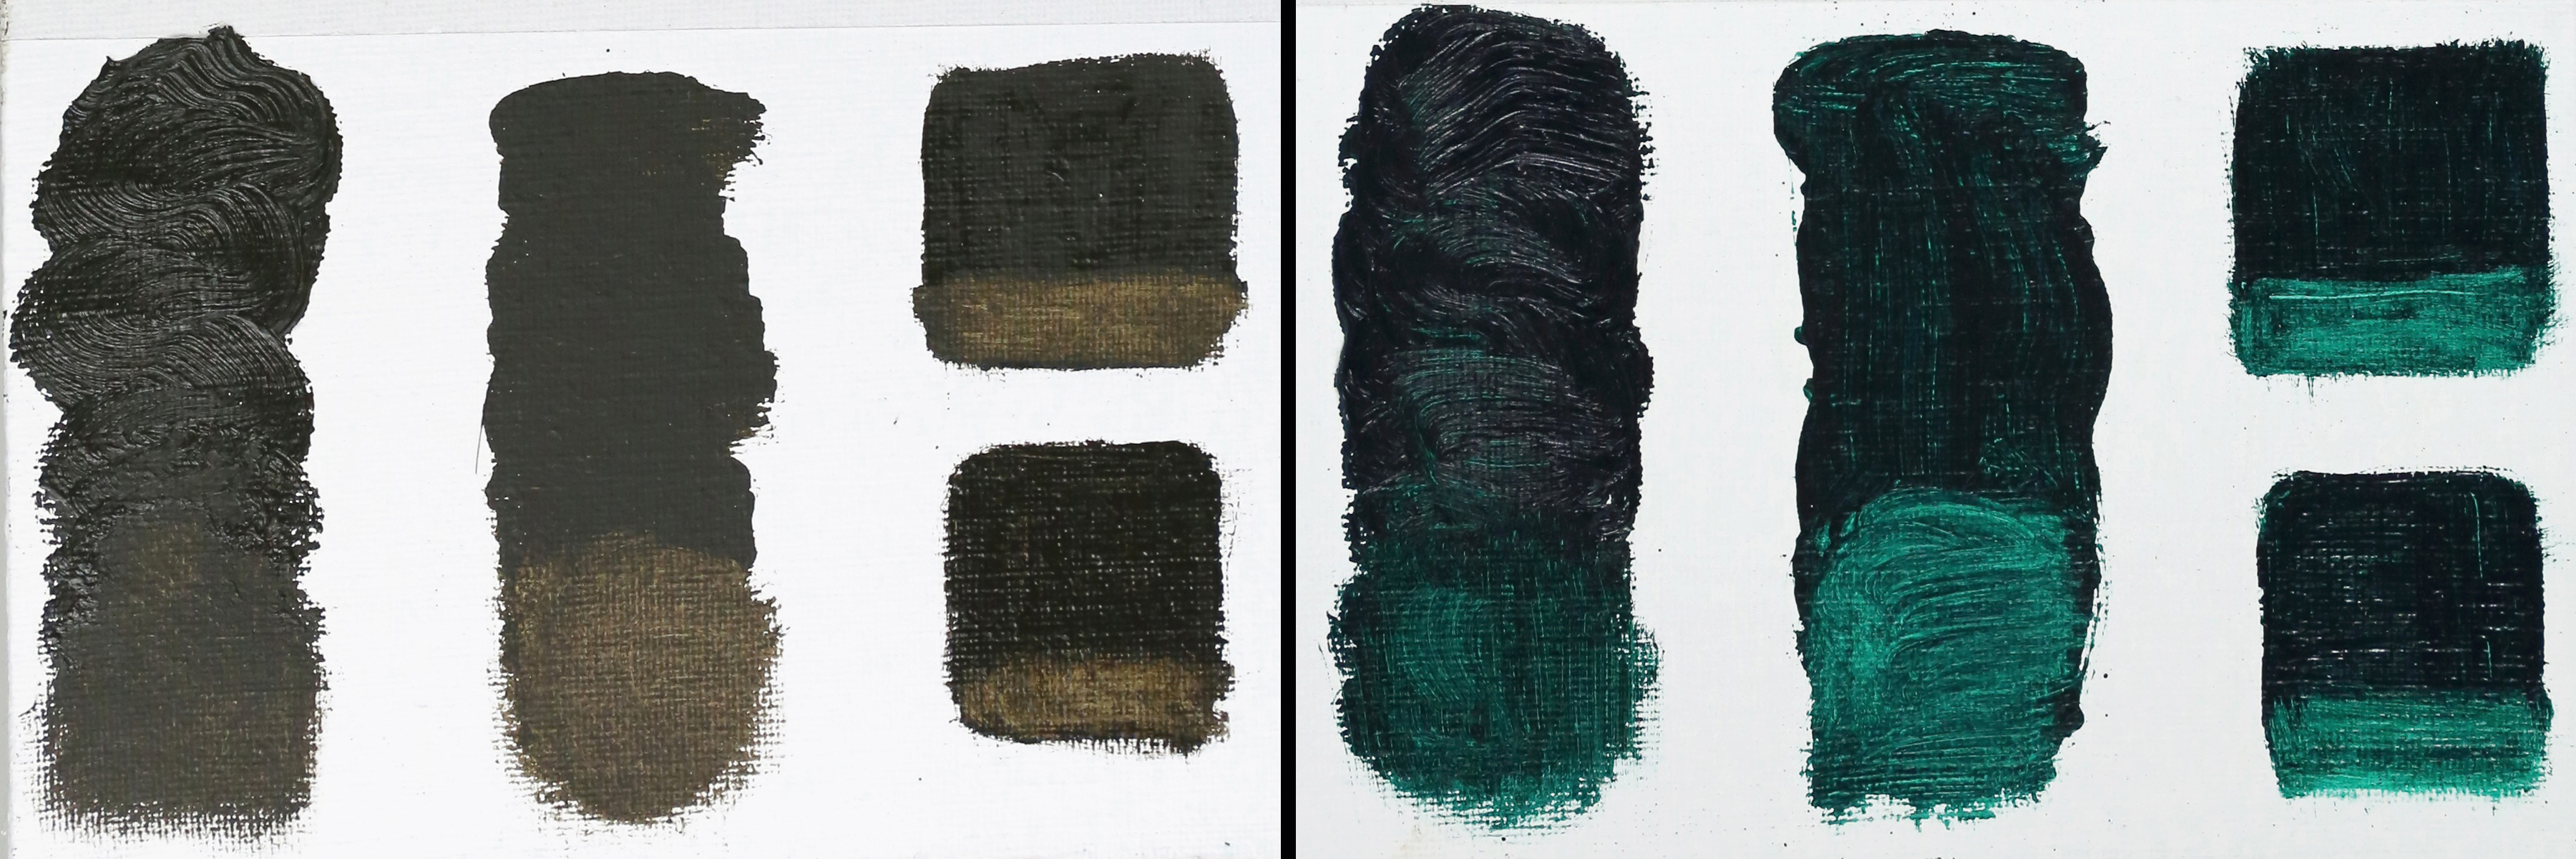
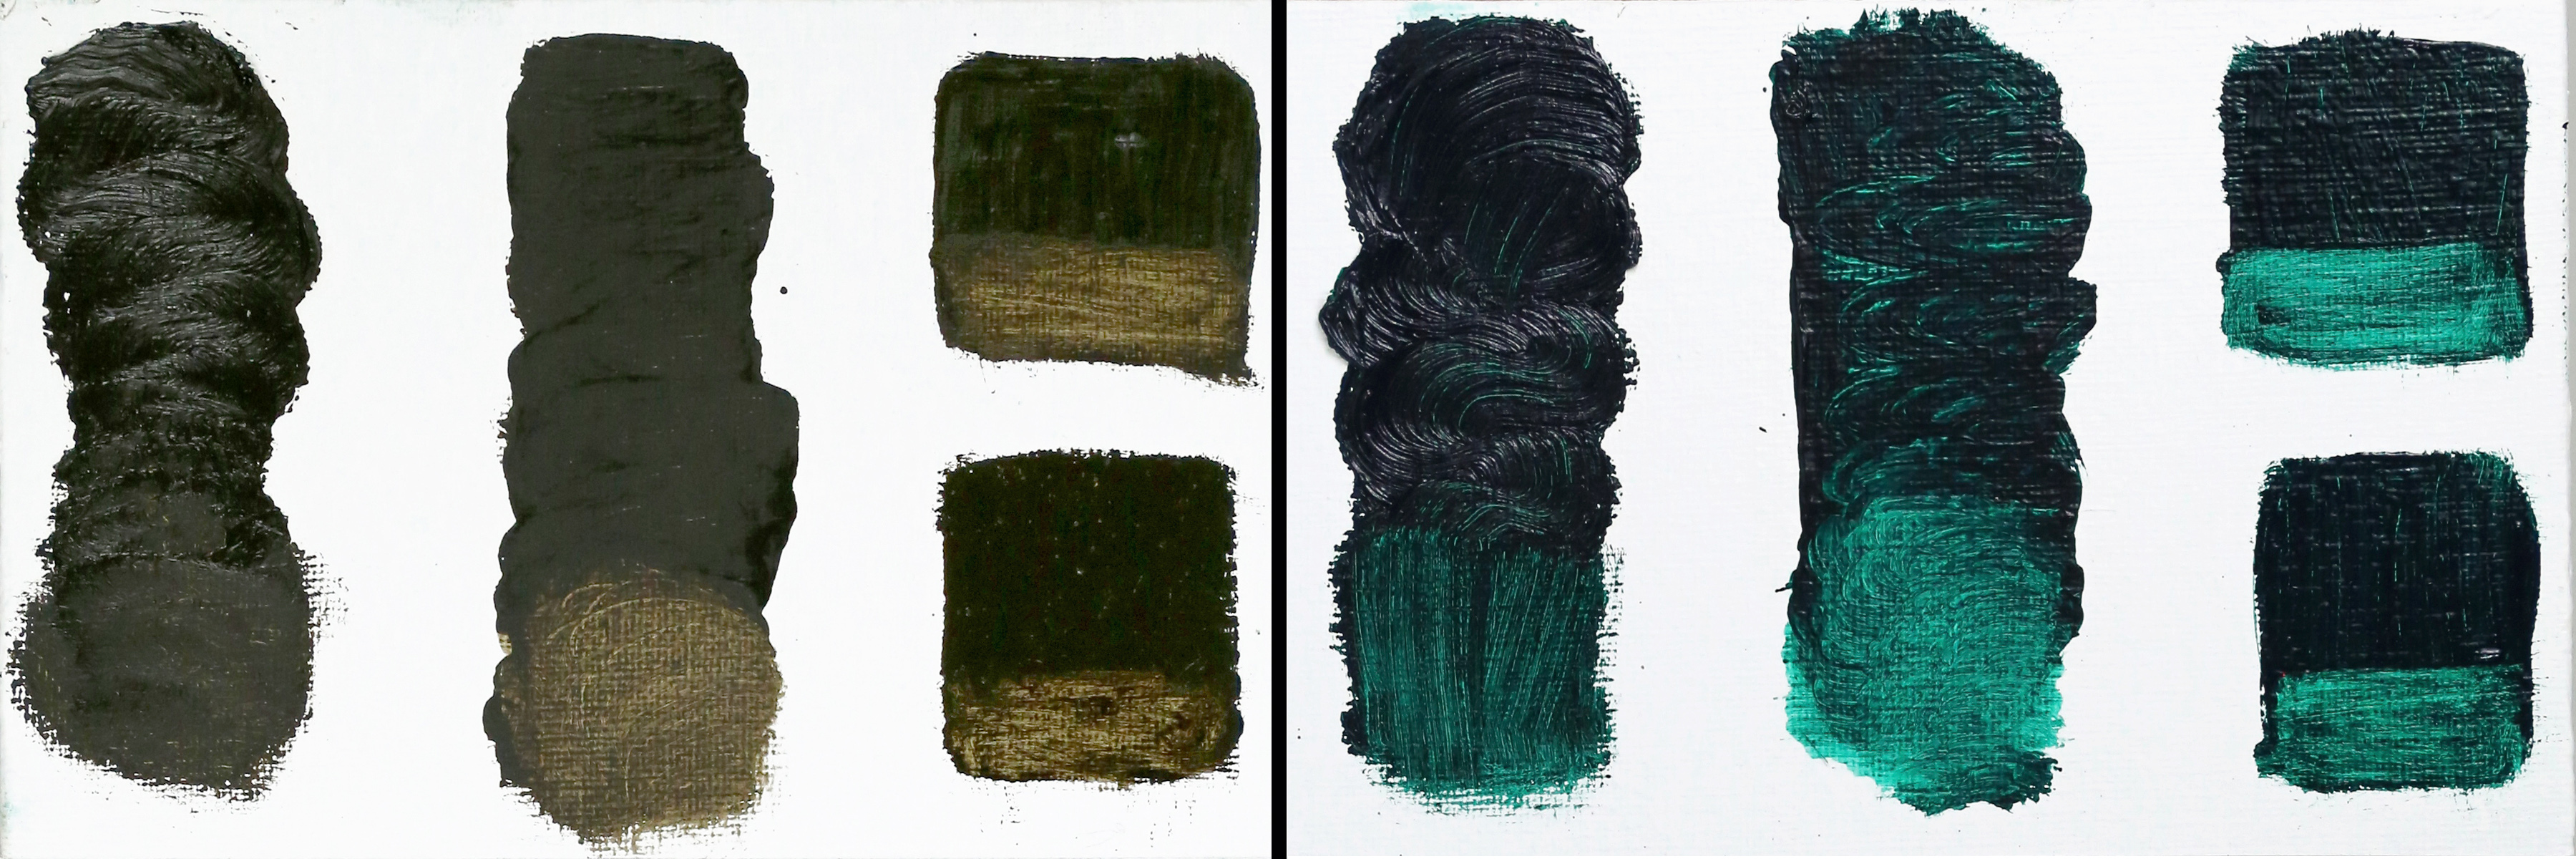
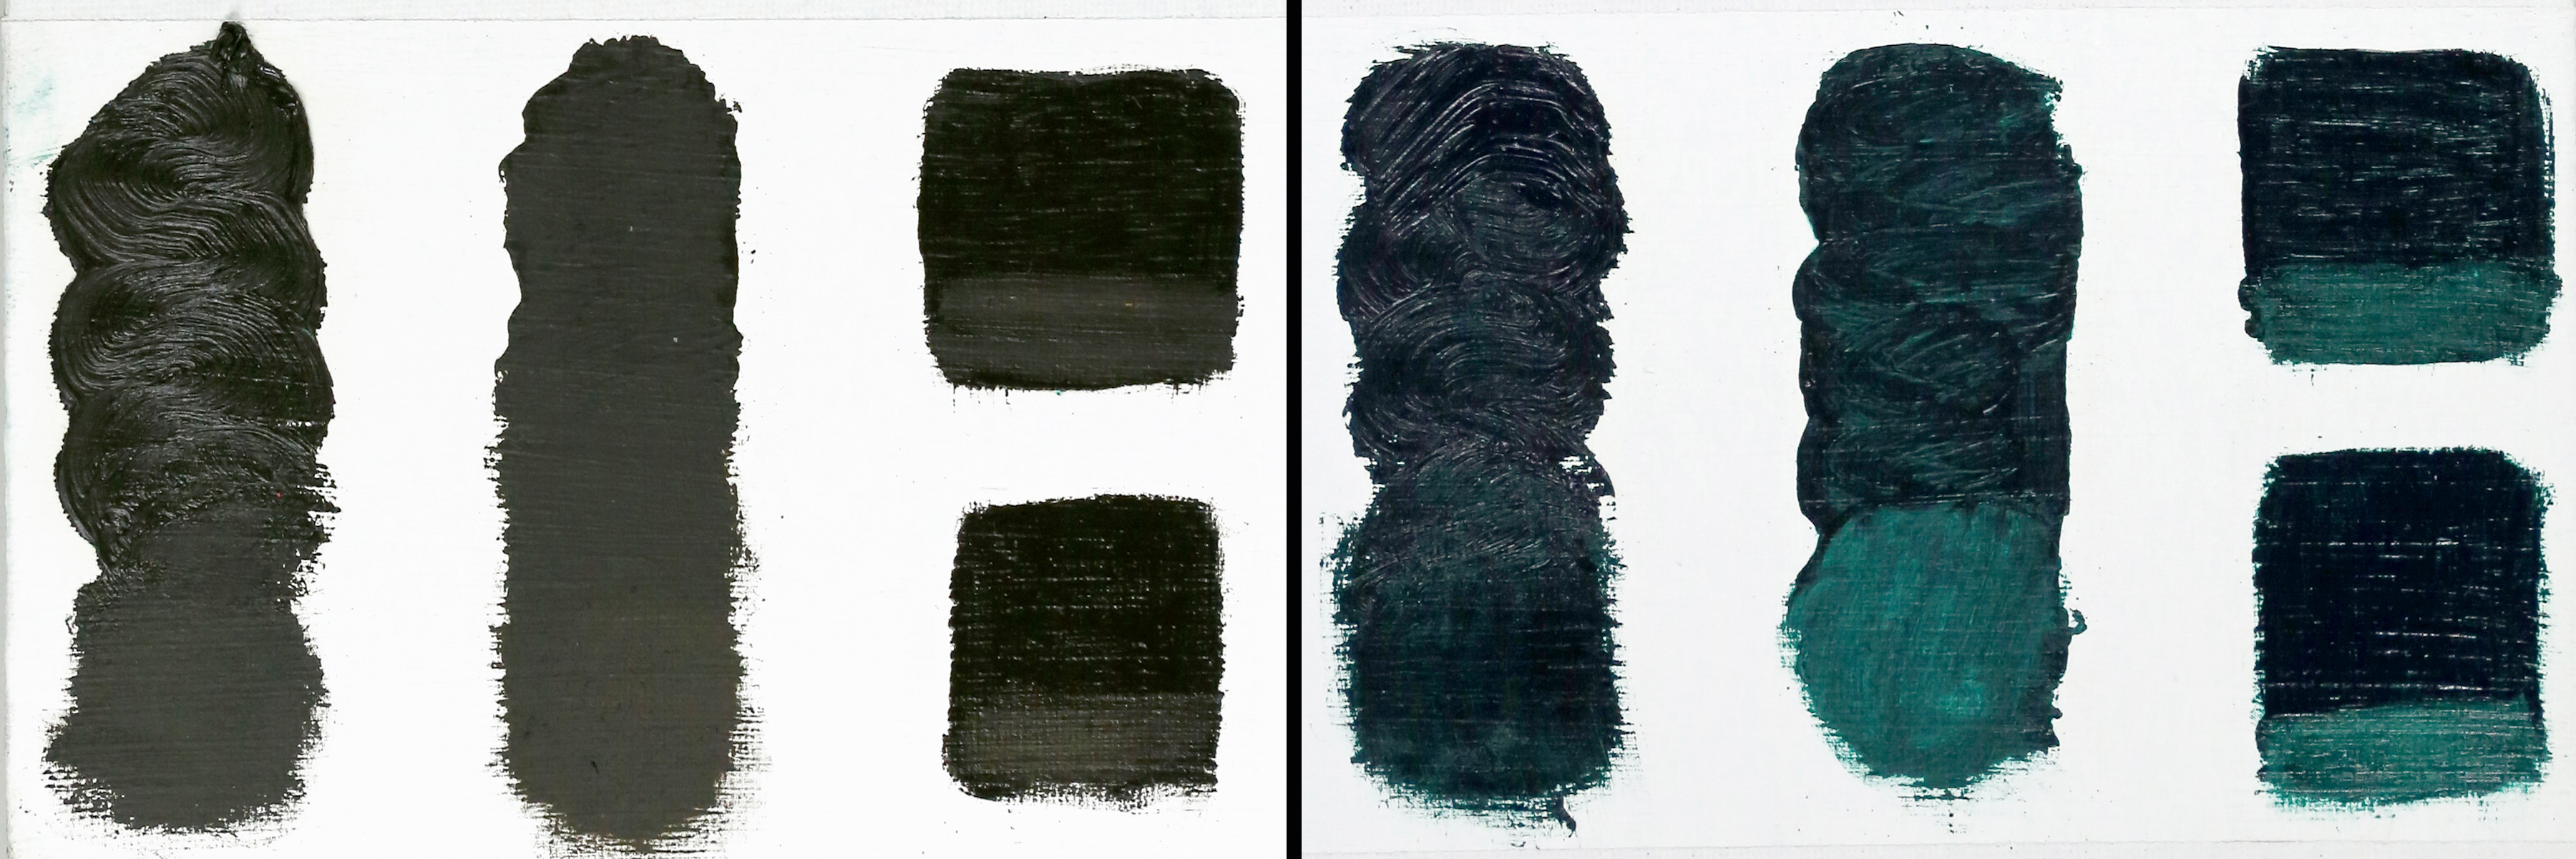
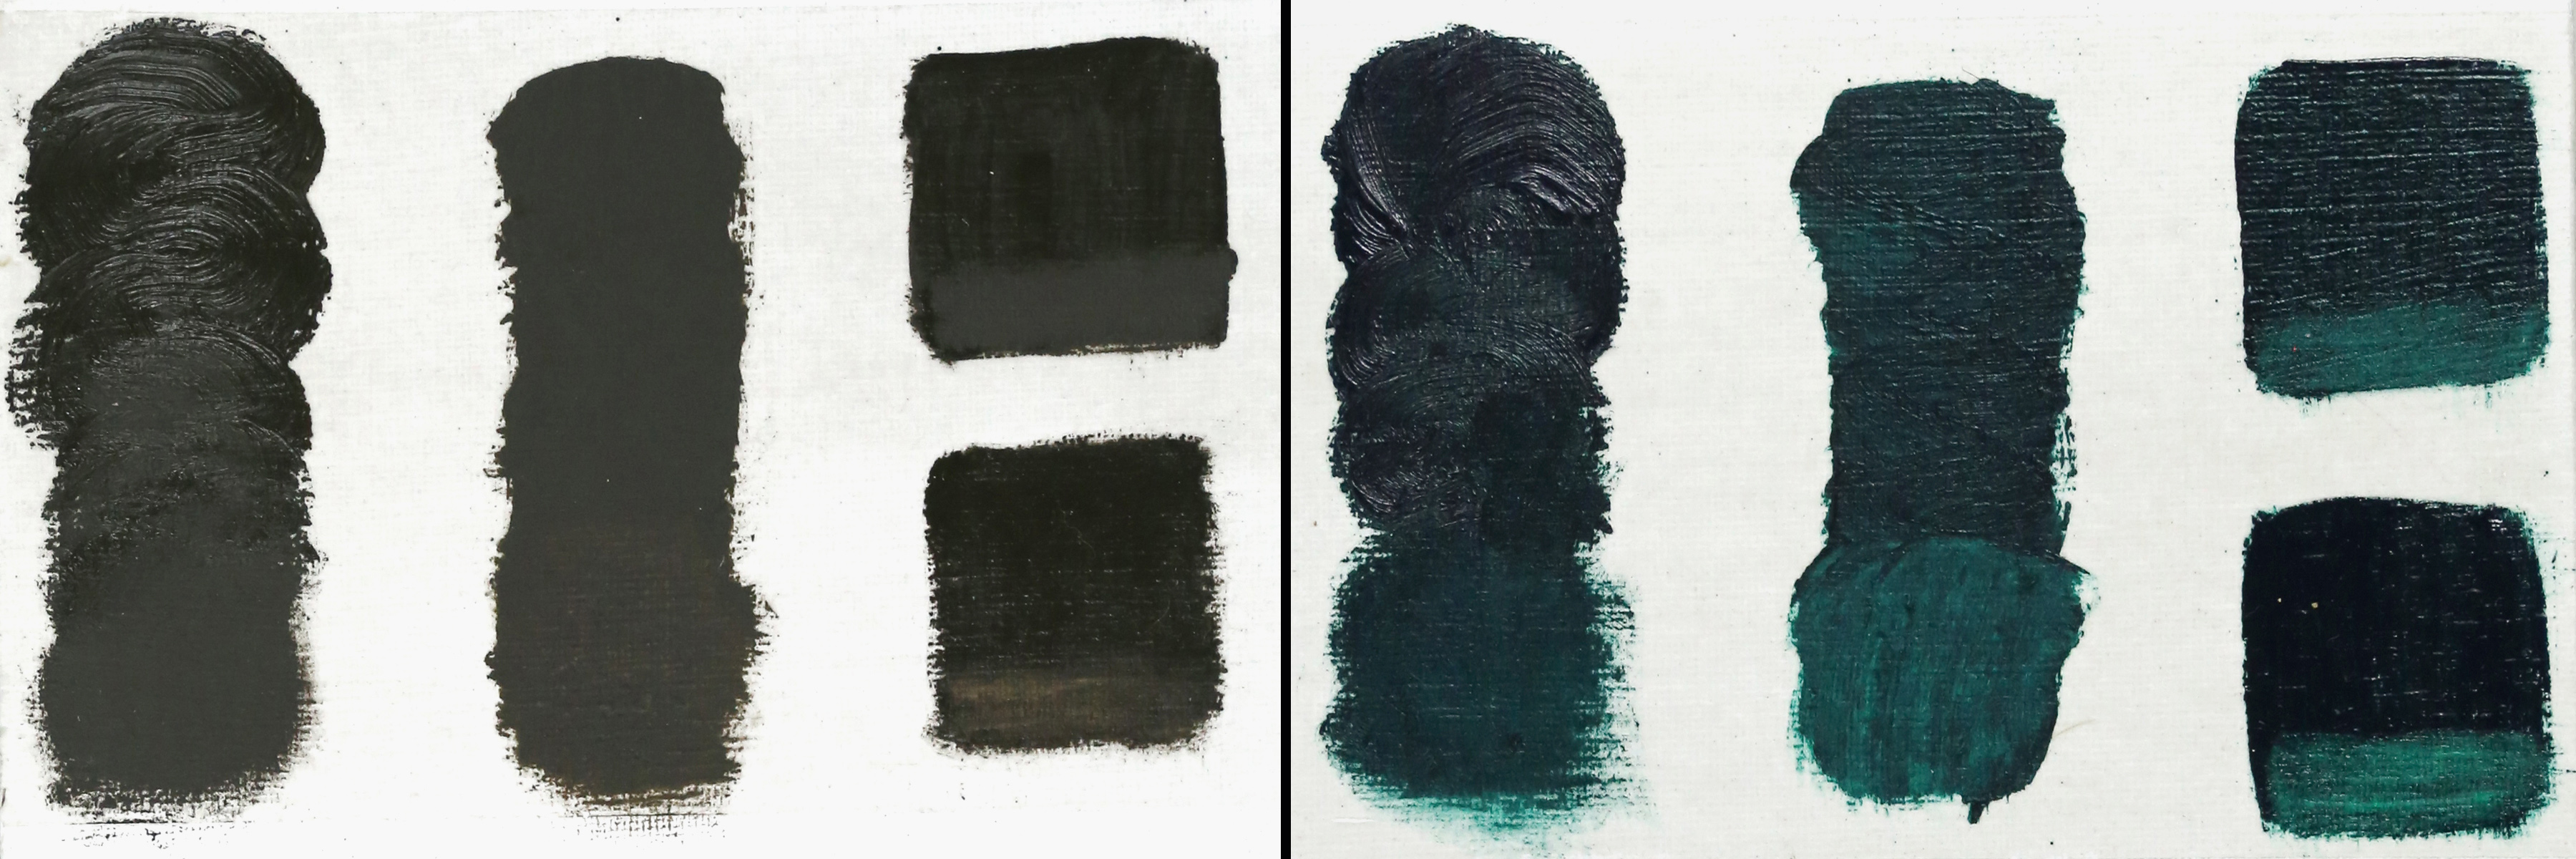
Overall, while slightly more absorbent than the various oil grounds, the word slightly needs to be emphasized. Neither application was anywhere near the extreme absorbency conjured up by so many on forums and discussion boards. That said, these tests only included our own brand, and sadly acrylic gessoes have become a category with a notoriously broad spectrum of quality and performance in the marketplace, with many being overly absorbent and even brittle due to excessive amounts of fillers and water. ??In the results, 4 coats did better than 2, feeling less absorbent and performing closer to an oil ground. However, wiping paint away was not as easy as with oil grounds, something that is frequently noted. (Images 6 & 7)
GOLDEN Acrylic Ground for Pastels / GOLDEN Absorbent Ground
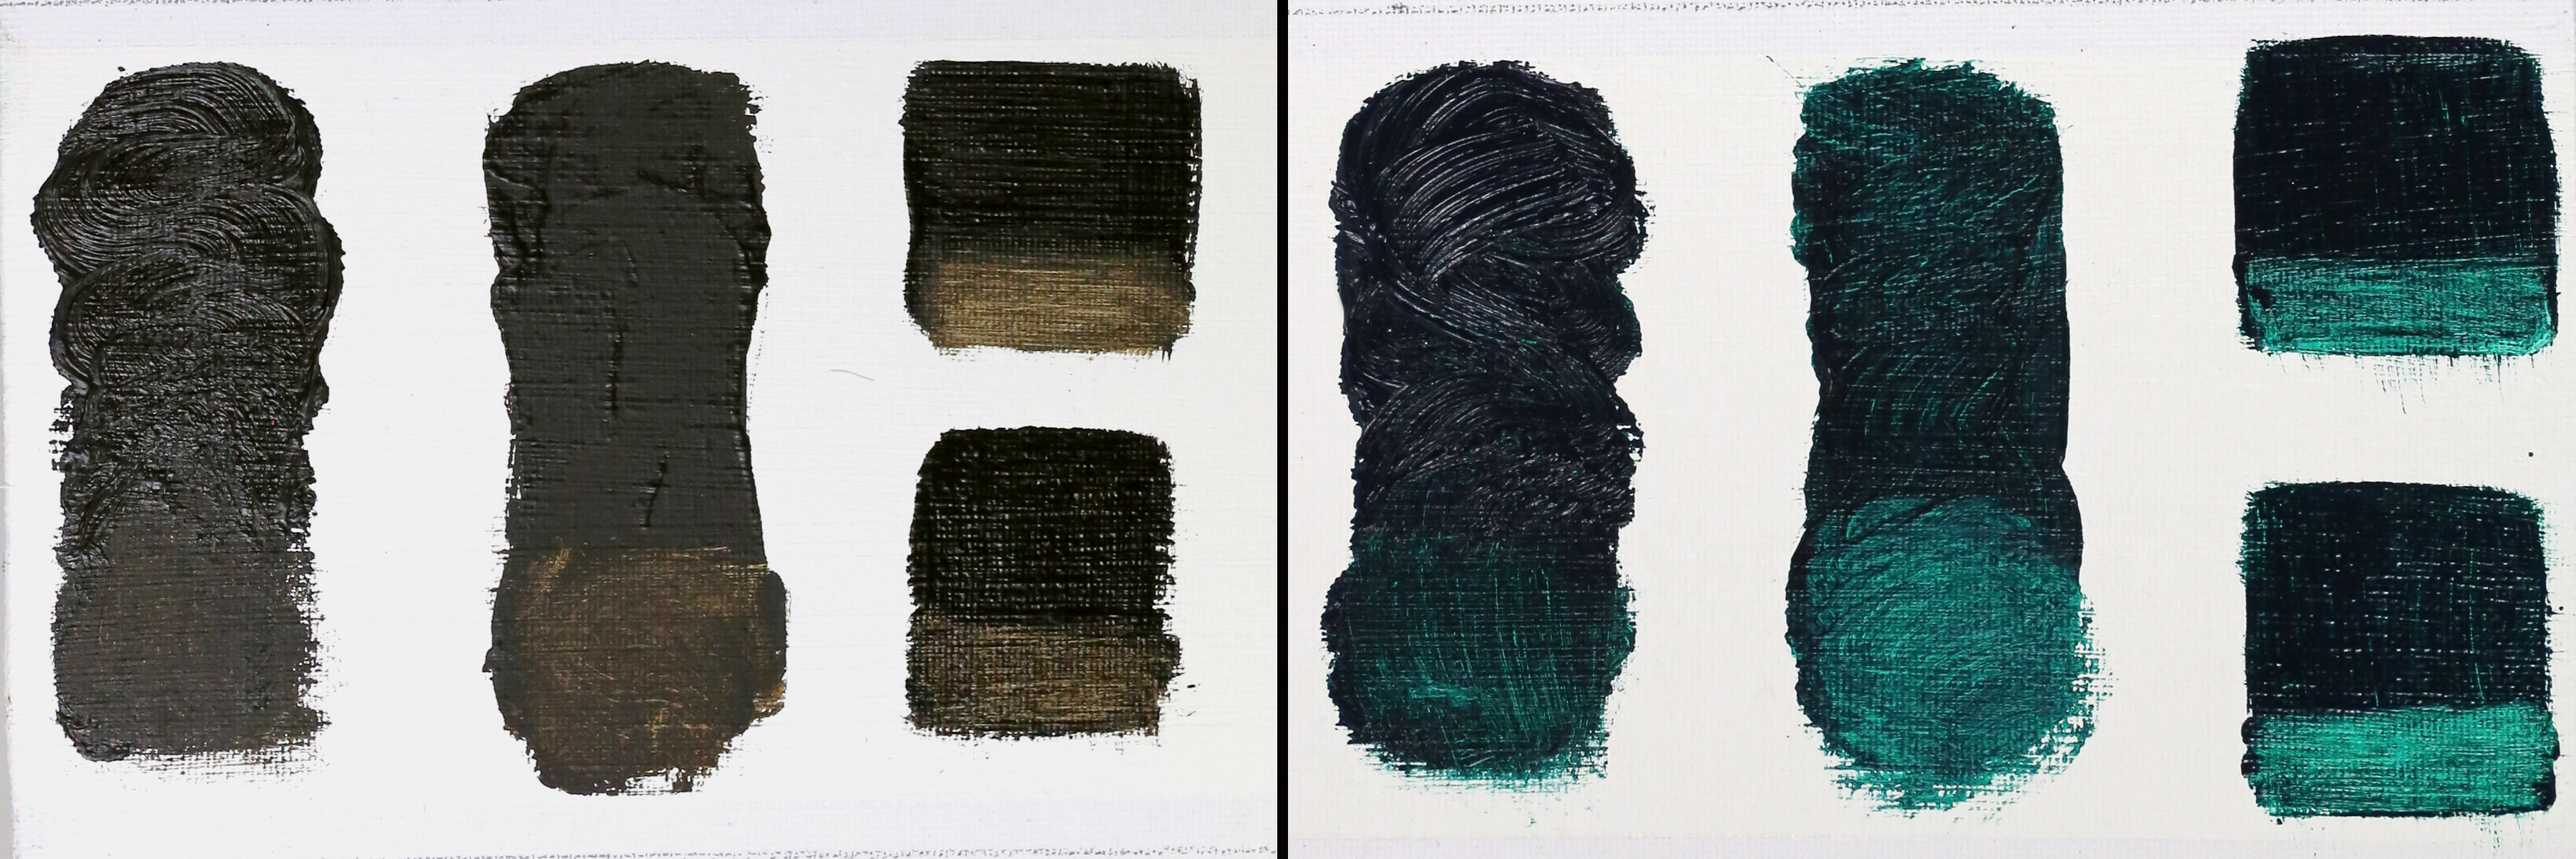
?In feel and performance these come closest to various traditional absorbent grounds, such as chalk gesso. In all applications Raw Umber had areas that were sunken-in, especially where wiped away or thinned with solvent. It clearly did best when Stand Oil was added. Phthalo Green, on the other hand, did okay – not as well as elsewhere, but clearly able to hold onto some luster and, with added mediums, able to maintain a glossy sheen even in a thin glaze. ??Please note, while included in these tests, the Absorbent Ground Tech Sheet cautions against the use of full-bodied oil paint applications as the extremely porous surface can absorb too much binder, leaving the paint sunken in or, at worse, underbound. (Images 8 & 9)
Williamsburg Lead Oil Ground, Williamsburg Titanium Oil Ground
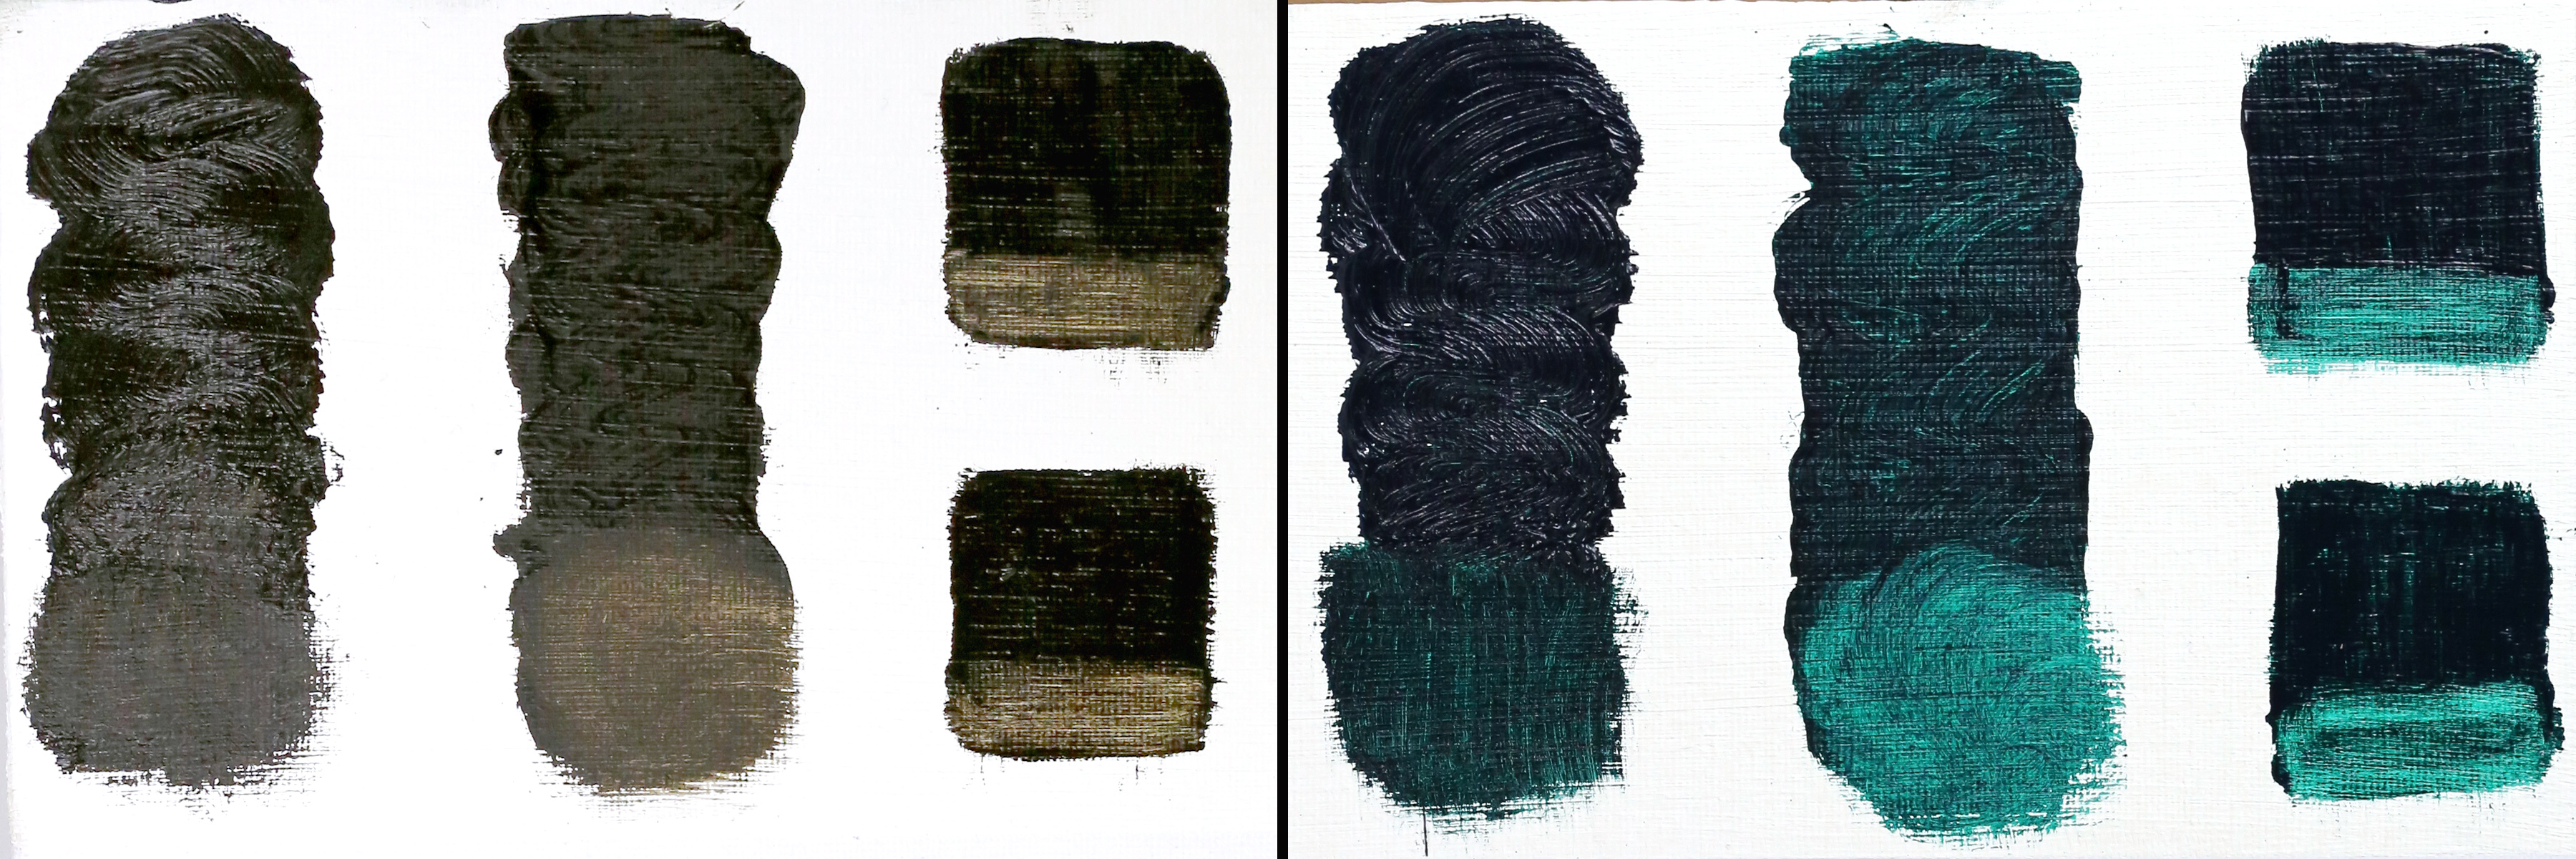
Both performed well, with minor differences mostly related to their sheen. The glossier Titanium Oil Ground allowed for glossier paints overall, although rubbed-out and solvent-thinned applications of Raw Umber still appeared blotchy and dry when no mediums were added. Phthalo Green, on the other hand, appeared glossy on both, even in the rubbed out areas. (Images 10 & 11)
Mediums
On absorbent surfaces the Stand Oil generally did better than the more fluid alkyd medium, its thicker consistency allowing for better hold-out and resistance to soaking in. However the Stand Oil, as expected, also dried more slowly.
Solutions to the Problem
In the past it was common to deal with this problem through the use of retouch varnishes or various recipes for mediums that were applied in order to resaturate the matte areas and help with color matching when starting to paint again. Unfortunately these were often extended over the entire painting, creating issues later on for conservators as these layers would yellow badly as they aged and, in the case of varnish, grow brittle and remain sensitive to solvents. In light of that, current recommendations are much more targeted and simple.
Initial Considerations
In general, oiling out is not recommended. However, if you choose to oil out your painting we recommend you follow the steps outlined in the “Best Practices” section below. If you are finding that you frequently need to oil out your painting it is best to consider the following factors that are likely at the root of the problem:
- Your ground may be too absorbent. Try experimenting with different grounds to see if this helps prevent your oil paints from sinking in.
- You are adding too much solvent to your paint. Try to avoid using too much solvent or even any solvent at all.
- You are using paint with a high pigment to binder ratio. Some paint formulations may inherently have a low concentration of binder. Try adding a touch of oil medium to your paints to help maintain sheen and body.
Best Practices
Repaint
If possible, repaint a sunken-in area with the same or similar color but this time add a small amount of a bodied oil, such as Stand Oil, which should prevent any further sinking in and, as a result, should dry with a soft but even sheen.
Oiling Out
When repainting is not possible or practical, one can apply a small amount of a drying oil only to an area you plan to work into, making sure to wipe off any excess. Preferably use the same oil or medium found in the paints or in that section, applying as little as possible and using only enough to even out the sheen. Never extend this treatment to the painting as a whole, or to areas that will not be painted over in that day’s session. Doing so can create problems with adhesion and the eventual darkening and yellowing of those areas.
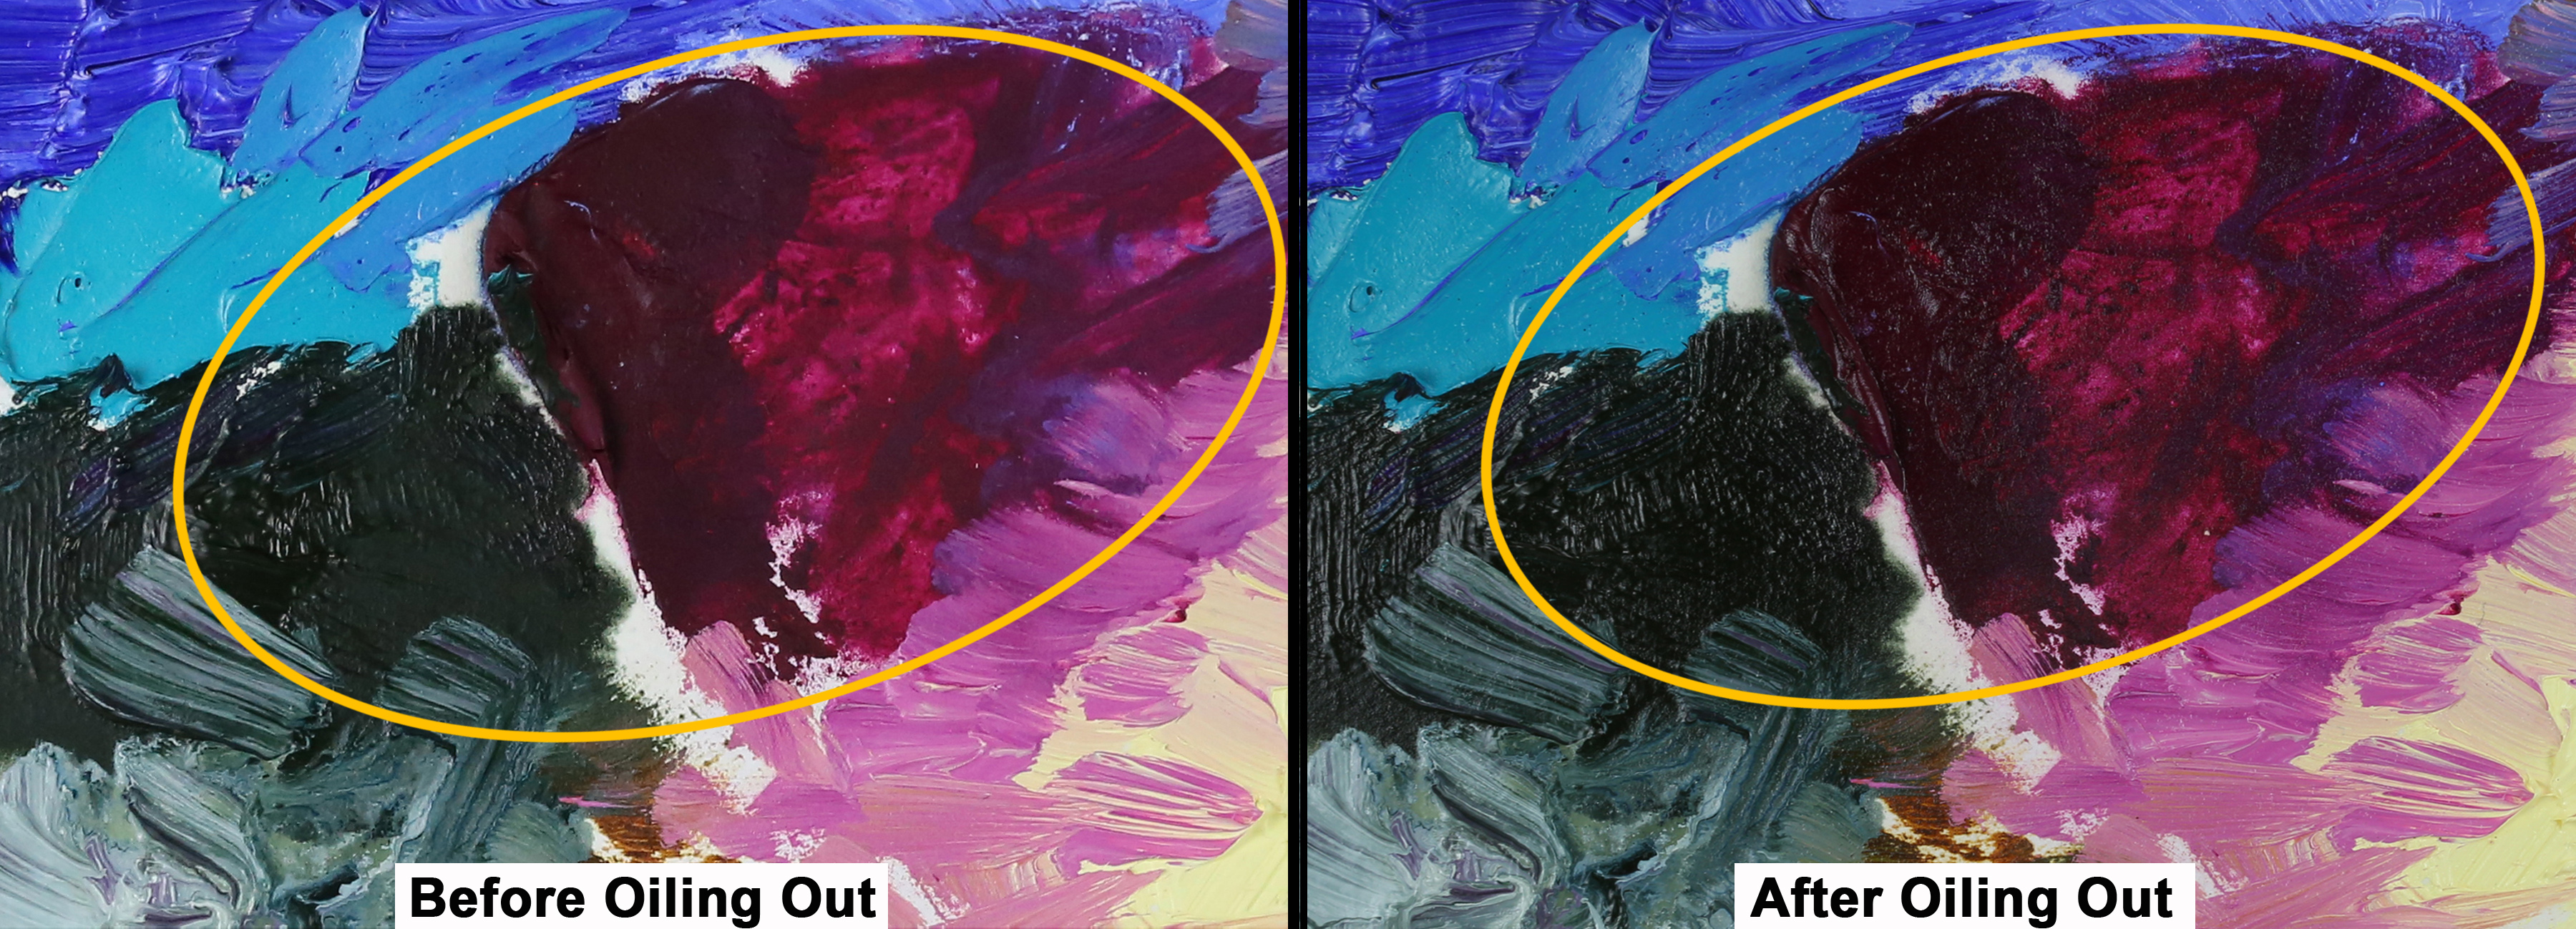
Adding solvent to the oil to create a thinner application, or thinning something more viscous like Stand Oil, is possible but care must be taken as young oil films can remain solvent sensitive, especially when underbound. In addition, solvents can extract materials from the film and make it more brittle over time.
Varnishing or Retouch Varnish Used at the End
This can take patience and try nerves, but if experiencing dead areas after a painting is finished the best thing would be to wait for it to dry sufficiently to allow for a final varnish. Waiting 6-12 months remains the safe rule before varnishing, and while there are some who advocate a shorter period, we feel there has not been enough research done on the possible consequences. That said, if needing to apply something earlier, after making sure it is at least hard dry, the use of a proper retouch varnish would be preferable. These are typically composed of thinned-down versions of full strength varnishes and should be applied as thinly as possible, aiming to simply create an even overall sheen. Damar and other natural resin varnishes should not be used for this purpose due to yellowing and embrittlement.
Not Recommended
Retouch Varnish Used in the Process of Painting
Despite the name, this is not recommended as a way to remedy sunken-in areas of color during the course of a painting. Doing so complicates the structure of the piece by introducing a very different material in between paint layers, not to mention that retouch varnishes are almost always removable and therefore poses a problem for future conservation and cleaning as they could be reactivated. That said, if you have used these, simply make sure to make note of it on the back of your painting.
Mediums or Oils as a Final Layer
DO NOT USE. More than any other practice, this is likely the worst option as it introduces a permanent layer of oil that will only darken and yellow with time and with few treatment options available to reverse this condition. Also, should you need to paint on it further, the dried layer of oil or medium could cause issues with adhesion, beading, and potential problems with cracking in the future.