
Pre-primed Canvas Adhesion Testing Procedures
In research carried out by GOLDEN’s Laboratory staff, two methodologies have appeared to be effective in testing pre-primed canvases for potential adhesion failures when using acrylic paints. The first entails observing the contact angle of a water-droplet when applied to the canvas as-is. The second is by applying actual beads of acrylic paint, which are then allowed to dry and attempts made to peel them off at regular intervals. Both approaches are detailed below.
The results and recommendations shared in this document are necessarily the outcome of limited testing, and for that reason cannot be considered definitive. Every attempt, however, was made to select a representative sampling of major brands, including examples from different price levels and countries of origin. In addition, two rounds of similar canvases were purchased several months apart, in the hopes this might better represent variations in manufacture or variability of lots. We also checked our results using paint samples from other major acrylic manufacturers and no significant differences in performance were noted.
Contact Angle of Water Droplet
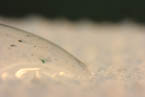
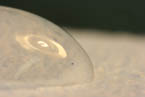
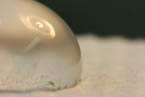
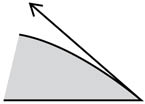
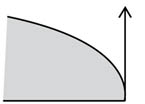
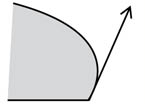
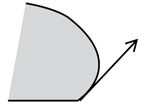
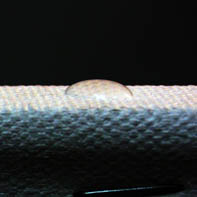
Early on in our testing a persistent connection was noted between the contact angle of a water droplet applied directly to an unmodified, pre-primed canvas, and the probability that adhesion problems would occur in later trials. The more extreme the angle, the more likely the subsequent failure. We are not advancing any theory as to the root, underlying causes of this phenomenon, but simply documenting what has been a fairly consistent association between these two events. In practice the test is very straightforward: one simply observes the angle of contact where a water droplet touches the surface of the canvas. When precision is desired, close-up photographs can be taken to allow for more accurate measurement. Four examples, which can act as illustrative benchmarks, can be found below:
 |
 |
 |
 |
|
1 Excellent
|
2 Marginal
|
1 Probable Failure
|
1 Failure
|
 |
 |
 |
 |
As can be seen, the angles that are described form part of a continuum and there is a sizeable middle ground that can be inconclusive. Because of this, results are most reliable when falling clearly on one end of the scale or another and the test should be used primarily for conducting broader, initial assessments.
Here are additional side views, showing similar representative droplets placed on the edge of the canvas, making the viewing of the angle of contact easier.
 |
 |
 |
|
Excellent
|
Marginal
|
Failure
|
Testing Direct Adhesion of Acrylic Paint
A more thorough test is to work with actual samples of paint applied to a canvas. Attempts are then made to remove the paint with a palette knife, starting at one end and seeing if one can cleave the paint away from the canvas. Generally speaking, a period of 72 hrs to 2 weeks is required for maximum adhesion to develop, so failure in the early stages is not necessarily indicative of the final result. We recommend testing at intervals of 24 hr., 48 hr., 72 hr., and then again at 1 week, 2 weeks, 3 weeks, and 4 weeks. Ideally one continues until adhesion failure no longer occurs or until no appreciable changes are seen after a given number of cycles or overall trial period.
Studio Testing Layout
Because canvases are not necessarily uniform and identical in manufacture or properties from lot to lot, not to mention across different sizes, it is important to test using the very canvas you want to use. Obviously this presents a problem for the artist who wants to preserve the face of the canvas for working on. In most cases, we are hoping, it should be possible to conduct these tests on the side or the back of a canvas, if excess primed canvas has been wrapped over the stretcher bar and stapled from behind. Below is one possible layout along these lines:
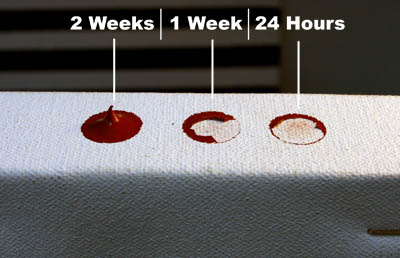
Notice that even though there is some initial failure, by the second week good adhesion has developed and the canvas should be fine to use.
Golden Laboratory Testing Layout:
In our own testing, parallel beads of acrylic paint were applied to the face of the canvas, squeezed directly out of a tube held at approximately a 45º angle, moving along a straight line while applying slight pressure. The resulting wet bead of paint was approximately 1/8" in thickness. To act as a control, we prepared #10 cotton duck canvas mounted on standard stretcher bars with two brush-applied layers of GOLDEN Acrylic Gesso. All tests were conducted under ambient conditions of 78º F and 48% RH.
Below are a range of illustrative examples of the results, culled from actual examples in our trials.
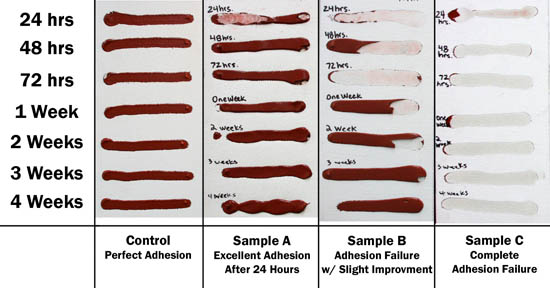
24 – 72 hrs: This represents the initial period of drying and the maximum adhesion a paint film achieves would not be expected to develop in these early stages. The Control and Sample A are clearly passing, at this point, while differing degrees of failure can be seen in the other columns. Sample C is the most extreme, where even the topmost layer of the pre-primed ground is being lifted along with the paint.
1-2 Weeks: Sample B starts to exhibit great improvement, with strong adhesion over much of the bead. This shows that clearly, for some canvases and situations, drying times will play a critical role and failure in the first 72 hrs is not necessarily indicative of performance later on.
3 Weeks: By this point the Control, Sample A and Sample B all show adequate adhesion. Only Sample C continues to fails, with the failure of the ground still in evidence.
4 Weeks: As above, the Control and Samples A and B all exhibit adequate adhesion and should be fine to use. Sample C, however, still shows failure and we would not recommend its use unless steps were taken to improve its performance and these improvements were confirmed by additional testing.
Ways to Improve Performance
Failure at such a fundamental level as the substrate is clearly problematic and will remain a matter of deep concern until we fully understand the underlying causes and can adopt more permanent solutions. In the meantime, however, we can pass along some simple strategies that can potentially improve the performance of most canvases, including ones showing marked adhesion failure. Nevertheless, the best method for assuring success remains the use of canvases that have clearly passed the above tests or by making one’s own support using professional and proven materials.
In general, adhesion was improved when canvases were lightly sanded with 220 grit sandpaper, followed by a thorough wiping using distilled water and either a soft cloth or paper towels, then by one or more layers of a professional grade acrylic gesso. The role of this last step is not solely to remove particles left from the sanding but also to eliminate any surfactants that might be deposited on the surface. The presence of surfactants can usually be detected by the tendency of the water to cause sudsing. Should this happen, continue wiping the surface until the suds no longer form. However, if working on linen, you will need to exercise caution since it can noticeably slacken in tension when exposed to moisture. Below is one illustrative example of the results that were achieved using a canvas that had marked adhesion problems in earlier trials.
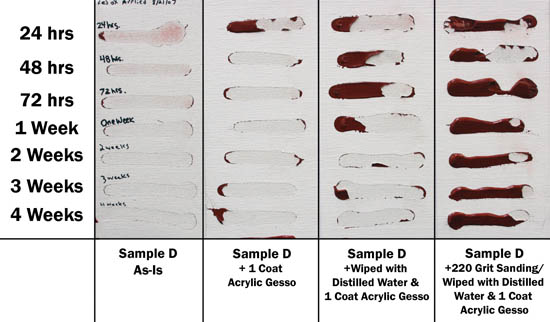
Steady improvement is seen after each step, with excellent adhesion clearly present by the last section.


